Kofi – the modular webbing locker
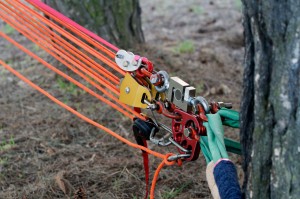
This article, for most readers, is meant to just be a bit of a curiosity. I am not encouraging you to build your own webbing anchor device. Why not? Well, unless you have access to: machining equipment; a qualified engineer who can double check that your materials and tolerances are safe for the loads the device will be subject to; and the capacity to test the device in a controlled/isolated environment (with a dynamometer) in several configurations before it actually gets used, I just don’t think it’s a good idea. There is a lot of work that goes into designing and building these things, and the devices offered by Balance Community and Landcruising are well-respected and well-tested — plus, they put in a lot of work and deserve to be compensated for that. So this article is meant to be simply informative to most people, and for the few of us who do have access to machining equipment, friends who are engineers, dynamometers, and a lot of extra time, it’s meant to establish a base level of knowledge about the state of webbing anchors. It will, hopefully, be a document in flux.
What I think a webbing anchor should do, and why I decided to build one
I wasn’t exactly thrilled with anything on the market. I already owned two slack bananas, and they worked great, but they were no longer made. I was actually a pretty big fan of the look and size of the AWL 1.0, but it also is no longer made. So, I decided to make my own webbing anchor device, incorporating various aspects that seemed desirable to me. The idea of NWslackline is to build community and advance the knowledge of slackliners everywhere. For this reason, I decided not only to build my own anchors, but to do so in a very public fashion, so that others (see above!) may improve upon my ideas. The following is a general guide to my design process.
Disclaimer! Longlining is inherently dangerous, and for this reason I must insist that you do not consider this a guide to building your own anchor by yourself. Consult a qualified professional engineer before you build and rig with any prototype devices.
So what should a webbing anchor do?
- Be bomber. 10,000lb / 44kn break strength or better.
- Be lightweight. Although we may use this to rig 1000-foot lines, it should feel at home on a 30′ line.
- Be small. See number two.
- Work well with a variety of webbing materials (nylon, polyester, ‘high tech’ webbings).
- Be quick and easy to use.
One thing I do know, by looking at what is publicly out there about the evolution of devices on the market, is that pin/bolt orientation is somewhat important. If pins are too small or too close together, the outer fibers (as they wrap around the pin) are required to stretch/warp too much, and they snap. Jerry at Balance Community explains these fiber issues well in his Slack Science blog. If the pins are too far apart, not enough friction may be generated and the webbing may slip far before its breaking strength. I seem to recall (but cannot find a link to) tests by Terry (“still-slackin-thru”) of the original banana which showed that Type18 slipped around 5500lbs, whereas in a shackle-locker (essentially no possibility of slip) it broke at 7200lbs. Lastly, to generate optimal friction, the orientation of the back, middle, and front pin is critical, so that under tension the webbing is pressing “down” on the loop that is captive in the front pin. There is at least one device on the market where manufacturer marketing pictures indicate that the line is not “pressing down on” the front webbing loop (from my perspective, anyway).
The design and build process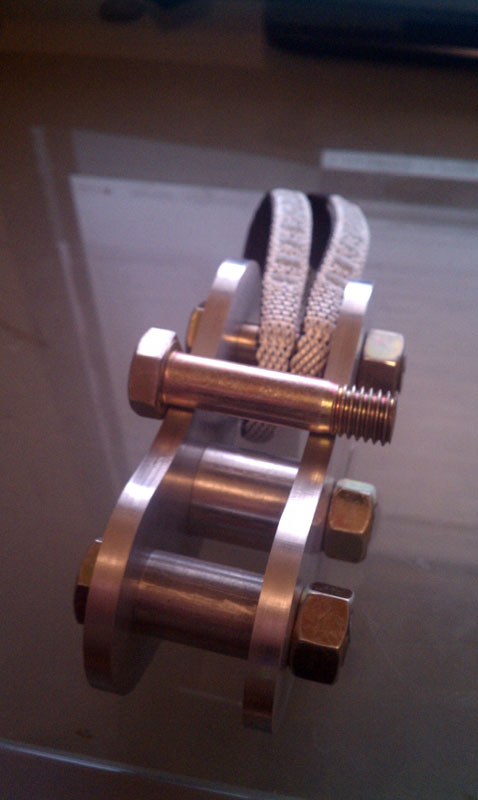
I mocked up a banana-type design similar to Michi’s 2009 model and traced it onto some scrap 1/8″ wood. I then modified the hole spacing, and found that everything seemed to fit properly still with the holes closer together by about 1/2″. Simultaneously, I had a big rectangle (slacktangle?) webbing anchor (6×3″!) CNC machined out of 0.25″ T6 aluminum to these specs. The goal was to test the properties of this device starting with small modifications on a known working idea and move forward. A friend of mine has been rigging on this slacktangle for several months now with no issues (other than the fact that it looks ridiculous and is bulky as heck).
Next, I laid out a “kidney bean” webbing anchor in Adobe Illustrator and consulted with a friend who is a licensed structural engineer. He verified my calculations, that the device (two plates of .25″ T6) would have a 50Kn break strength (11,250lbs). I first laser cut this out of acrylic to check webbing fitment, and after verifying the fitment seemed good, moved on to CNC machining a prototype. I elected to use .5″ grade 8 bolts, not because we need bolts this strong, but because overkill is something I believe in, and additionally .5″ is a very common size and makes finding commodity hardware easier. The double sheer strength of the bolts exceeds the strength of the plates they are going through. If we want stronger plates later on, we can change thickness or material type, and because the hole spacing and size won’t change, everything else (the function of the device) should remain the same.
Almost every webbing anchor uses spacers/rollers, mostly to increase the diameter of the webbing loops. I settled on a 1″ center roller and .75″ outer spacers for testing. This is very close to what the original BC-edition banana used. The spacers can be swapped out to longer versions (along with longer bolts) for the ability to rig 1.25″ (32mm) or 2″ (50mm) wide lines, such as RAGEline or the Gibbon SurfLine. Some (most?) webbing anchors also use spacers as a way to protect the webbing from the threads of the bolts, as well. With my design this isn’t necessary, as we have special bolts that are unthreaded for the length of bolt within the device — this means the bolt is extra strong where it is being stressed within the device, and there is no chance the threads can contact webbing or can damage the aluminum sideplates or spacers/rollers.
The front pin, where the main loop of webbing reverses on itself, can be a bolt and nut (for ultimate security) or a super-strong quick-release pin (1000+lb pullout force) for quick setup (the downside to these pins is they often cost more than $40 each!). Initially I believed a .75″ front spacer around this pin/bolt was necessary, but many tests on various webbings have shown that the majority of stronger webbings will hold 5000+lbs using just the .5″ front bolt/pin with no spacer (one type of poly webbing slipped an inch or two in the high 4000lb range).
The rear bolt allows for a variety of rigging configurations. Either two bomber forged 3″ rings (88Kn), two 2″ forged aluminum rings (64kn), two 4″ dyneema loops (44Kn), a standard 6″ tubular nylon loop (32Kn), double carabiners, double 3/8″ teardrop rings, or a single 3″ ring with a special tapered bolt spacer to keep everything centered — any of these setups can mate to a shackle, quick link, carabiner, or directly to a sling. I wanted to design a device that could mate to a shackle and offer 20,000+lb strength (with the right configuration and 7075 sideplates) for highlines and super-longlines, but also be super lightweight and go right on a homemade sling (no shackle required) for folks who want to travel light and only need 6,000 – 10,000lb break strength.
For now, here is the device at a glance:
| Kofi (6061) | |
|---|---|
| Total Weight: | 475 – 525 grams (1.0 – 1.1 lbs) |
| Ultimate Breaking Strength (UBS): | 62.5 kN (14,050 lbf) |
| Working Load Limit (WLL): | 12.5Kn (2,800lb) |
| Dimensions: | 4.9″ (L) x 2.4″ (H) x 1.5″ (W) |
| Sideplate Material: | 6061-T6 aircraft aluminum (0.25″) |
| Roller Material: | 6061-T6 aircraft aluminum |
| Roller Diameter: | 1″ (25mm) & |
| Roller Width: | 1.0″ (25.4mm) standard + 2″ (50mm), 1.25″ (32mm), 11/16″ (17.5mm) options |
What webbings will a Kofi work with?
The default setup will work with any 1″ webbing (24-26mm). Because polyester and super strong ‘high tech’ webbings (such as Spider Silk) are known to slip at high tensions, it is suggested that with webbings of these materials, an alternate (“double wrap” or “wrap and a half”) method (or tail securement) is used. The secondary (.75″ diameter) spacer should probably be used with “high tech” webbings — our testing will soon show whether it is necessary or if it helps avoid slippage at all. If you want to rig 1.25″ or 2″ wide webbing, or even half-inch webbing, this is entirely possible with a different spacer/bolt set. I have rigged all of the above webbing widths using the Kofi.
What rear-bolt connector options are there (to connect the Kofi to a spanset/sling)?
I already ran over it a bit above, but the basic premise is you can go down one of two roads: either a fabric sling, or a metal connector. Fabric slings should probably connect to metal hardware (e.g. a shackle) rather than more fabric (e.g. spanset). I have not yet tried putting thick rubber hose over a spanset, but others have had success with this for shortline rigging (to my knowledge it is untested for high-tension rigging). I have a friend who is using the dyneema slings directly on a spanset, but I don’t recommend it.
Fabric connectors:
- Dyneema 8mm slings (22kn each x2)
- Nylon 1″ slings (32kn x1)
Metal connectors:
- single or double 3″ steel ring (1/2″ metal stock)
- single or double 3″ teardrop ring (1/2″ metal stock)
- single or double2.5″ steel ring (1/2″ metal stock)
- single or double 2.25″ teardrop ring (3/8″ metal stock)
- doubled 2″ aluminum ring (1/2″ metal stock)
- doubled carabiners or quicklinks (not advised)
This is the part of the article that could really be expanded to be its own individual article. I have tried a LOT of different rigging methods, and I love that the Kofi will accommodate basically anything I want to do. Modularity is good, and I love tweaking rigging to get everything aesthetically perfect. I started using fabric connectors, and here I would favor doubled 8mm dyneema slings (for redundancy). With the 44kn break strength they are definitely up to the task. That said, they could “somehow” maybe be cut, so I started to favor metal hardware. The 3″ rings are preferable because they are insanely bomber. But, they are fricking HUGE. They dwarf the device as far as size goes, so unless you need to p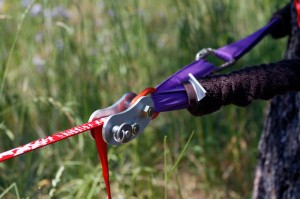 ass a few spansets I don’t think they are optimal.
Next I started to favor doubled 2″ rings. They are light (forged alum), small, and strong (32kn each!). Because of the amount of “meat” that the Kofi has around each bolt hole (more than 1/2″ of material) this means that a 2″ inner diameter ring (which are actually not quite 2″ in my experience) will not have more than 5/8″ of space left to pass a spanset/sling through. For a nylon sling, or a purple spanset, this will be fine. For a green spanset, it won’t.
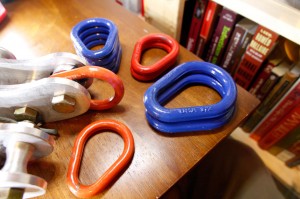 Next, knowing I wanted a metal connector that was small, strong, and allowed for a large enough opening to comfortably pass a green spanset, I started working with teardrop shaped rings. My basic thinking was that I wanted more lateral space with the same vertical space, and this would mean a non-circular connector. The cool thing about the teardrop shape is that it is actually stronger in the loading direction than a totally circular ring (which is equally strong in all directions). So the 2.5″ ID teardrops can have a MBS of 15,000+lbs, compared to the 10,000lbs of a 1/2″ barstock circular ring. And the 3″ ID teardrops go as high as 42,000lbs (again, compared to ~10,000 for the typical 3″ ID circular ring). The teardrops are therefore safe to use by themselves, or in double. And two will easily fit. I generally double them. The cost on them varies, depending on maker, but they can be cheaper than an equivalent sized circular ring. Color can denote either strength or manufacturer (so you need to be pretty familiar to know what each color means), so rather than using up any more space, let’s just say everything pictured has a break strength exceeding 10,000lbs-per-teardrop. Best of all, even the 2.5″ ID version (i.e. the smaller ones) easily pass purple spansets as well as green!
So now the question becomes “to double or not?” Doubling costs twice as much for the hardware, but it allows you redundancy, and it keeps the Kofi more stable under weird loads (surfing, etc), which means everything stays straighter. Plus the extra surface area means less stress on your spanset/sling. Also, if you don’t double, then you need to come up with some hardware method to keep your ring/connector centered, and that might be just as expensive as the extra connector. So let’s talk about the cons/options of each method.
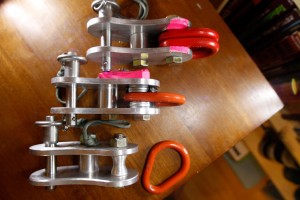 Doubling on thinner hardware (or just-slightly-less-than-half-inch hardware such as the aluminum rings) is straight forward. You just put the connectors on there and you’re done. Basically there will be 1/16″ or less of “play” to the side of each connector, so everything will sit pretty straight. I have taken to adding a washer on each side if I want to make sure it all sits absolutely perfectly, but this is not necessary (I am just anal). Doubling on 1/2″ thick hardware is more difficult. The 1/2″ hardware tends to be just over 1/2″ (the 3″ rings that BC sells are a miniscule amount over 1/2″) and so you cannot fit two of them in a 1″ space. I do have some 3″ rings that are truly 1/2″ and so they fit doubled up, but the source I had for the rings is no longer in business. Sanding/grinding rings down is a bad idea because of microfracturing etc, so one would proceed there at great risk. A way I got around this was to create a special spacer that would widen the device while “taking up space” for the front two holes and not the rear anchor hole. This means the webbing still fits tight, but the device is now 1 & 1/16″ wide in the rear hole (allowing for double 1/2″ rings). Because the smaller teardrop rings are so strong, and because they work “off the shelf” I have only made two of the aforementioned widening spacers (because they are a pain to make and doubled 1/2″ thick rings are overkill). If I needed to pass three or more green spansets, I would probably use this special spacer method, though. But I would only need to do that for some crazy type of highline rigging.
Single connector means everything will fit, but you need to keep it centered. There are two ways to do this. One is with a centering tube. This is basically a smaller “roller” that is grinded so anything that sits on it will naturally slide to the center. Landcruising’s solution is so pretty I just have to link to it. So I could do this via notching, or by making it into a sort of hourglass shape. I elected to do the second because it seemed more elegant. I did it by hand using a lathing method (and sandpaper), and it wasn’t super quick, nor super cheap. Including renting lathe time, each spacer (I made 4) cost me about $10 (still cheaper than $16/ea for the ZenTube, but mine are not as pretty, and $10 is too much!). Eventually I decided to try washers instead, and found some varying thickness washers that fit perfectly and cost less than $.15/each. This means 5/8″ wide worth of washers is about $1. This is my new go-to method for filling space in the “hardware connector area.” For a different angle on the scene in the photo at left, click here.
What is the absolute best method? I guess it depends on your perspective. There might be something even “better” I just haven’t thought of yet. And of course, I haven’t directly connected a shackle to the Kofi yet. That, for some reason, doesn’t appeal much to me, although it’s definitely a bomber way to go if done right. For now, I think doubled teardrops is the method of choice, but dyneema slings, doubled aluminum rings, basically all of the other methods are adequate for many if not most situations.
Random important lessons I have learned.
• Roller width is critical. At first I wanted to overshoot this a bit, so the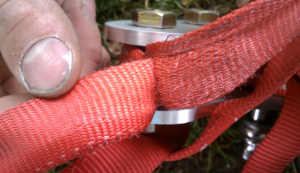 webbing would pull through the device a bit easier. So we went with 1.1″ instead of 1.0″. In pull-tests I found that polyester webbing can actually “slip out from underneath itself” using this extra margin. It would pop out around 4500-5000 lbs or so, and then a fraction of a second later “slip back under itself” and catch the remaining tension (maybe 3000lbs) melting the webbing to itself in the process (see image at right). Although 4500lbs is well beyond the safe working limit of both this webbing and the Kofi, the slipping and melting is still not ideal. Changing the roller width down to 1.0″ appears to eliminate this (this same webbing now holds 5,000+lbs (with a rated break strength of 6600).
• Rubber printed and resin impregnated webbings pull through the Kofi very poorly. This is nothing new, I think they do this on all devices. They just have more friction. In general the thicker, stiffer, and stickier the webbing the harder it will be to pull slack through. Tubular nylon is a DREAM to pull through the Kofi. The more compact the device, the more difficult the pullthrough will be as well. Also, you should never load rubber printed webbings upside down. The rubber print should always be facing up (or “out” if for some reason you were rigging the Kofi upsidedown) — this is true, I believe, of all banana devices. (I loaded the rubber print facing “in” just one time and it was not good. I actually can’t remember the details of what happened, I think the extra friction melted the rubber maybe, but whatever happened I made a permanent mental note never to rig this way again.)
• Bolt spacing is also key. Perhaps if the bolts were further apart the webbing would also pull through easier, but I reason this would allow it to slip easier. My goal was to make the device as tiny as possible while still allowing for various webbings to be used. Tubular nylon is very thin. Webbings like Mantra, Gibbon ProLine, and Type-18 are much “thicker” and require more space. In general you need to think about the thickness of 2 or even 4 layers of the webbing (depending on how you plan to wrap) in order to know the minimum hole distance. Also, if the device is symmetrical (like the Kofi is), that means the rigging bolt (rear bolt) can have a space impingement issue with the webbing too. Devices like the AWL/Lynx/etc avoid this by moving the webbing bolts (front and middle bolt) forward and leaving a bigger gap between the middle and rear bolt. The minimum distance between the inner edge of the rear bolt and the rear edge of the middle bolt should be 32mm (in my opinion). (This last dictum assumes a 1″ roller — the bigger the roller the more you will need to increase this distance.)
• Roller size. I think there is some benefit to a 32mm roller, or even a 40 or 50mm roller. However, from what I do know of break test numbers that commercial webbing anchor manufacturers have generated while designing their products (and shared with me later) it seems like somewhere around the .75″ – 1″ mark you gain 10% in break strength improvement for every 30-50% of roller diameter you increase. So a 40mm roller might offer a 10% reduction in the difference from “rated strength of the line” and “actual break strength in the device” when compared to a 25mm roller, but this improvement is probably only a 10-20% reduction (of what might be less than 5% under rated strength) despite a near doubling in roller size. For my uses, I am balancing the size/weight/cost of the device against the ability to turn in the best possible technical performance. I feel like 25-32mm is the sweet spot for that. I have further testing planned to verify this (see below). Basically a roller should never be below .75″ in diameter, and I really feel like 1″ should probably be the minimum. If you use a .5″ or .75″ roller with static webbings, you’re going to have a very low break strength.
• Bolt threading. As I said before, having threads inside the device is not a good idea. This necessitates protective spacers in a place you might not want to use them, weakens the bolts’ performance in sheer strength, and if the device is aluminum it will likely blemish the device or even distort the bolt holes at high enough tensions. Sourcing the right bolts is difficult, but worth it (to me). Shoulder screws are another option, but again still would have threads inside the bolt holes on at least one side plate. The way I’ve done it, the device is as strong as possible, and any bolt can be substituted for a quickpin whenever desired.
• (50mm) 2″ Webbing. I have heard through the grapevine that others have had issues with 2″ webbing in their devices, and it would stand to reason that 2″ webbing must present SOME problems, since there aren’t a lot of 2″ webbing anchor 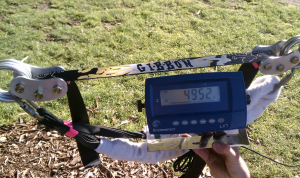 options on the market. Or perhaps the demand for these devices is just too small. To address some rumors I have heard: what I do know is that in my testing, 2″ webbing holds 5000lbs of tension without slipping. I have also heard that the tension needed to trickline will bend the bolts. This, so far, has not been my experience (and my gut would say they shouldn’t bend, since the tensile strength is well over 20,000lbs, the single sheer load at threading should be around 13,000lbs, and the double sheer load of the non-threaded portion will be in excess of 26,000lbs … given that grade 8 bolts are tempered to NOT bend, I am skeptical of bending). You can calculate tensile by taking the tensile stress area of the bolt, multiplying it by the PSI tensile strength of its grade (150,000psi for grade 8), and then single sheer is generally 60%+ of tensile.
• Steel versus aluminum. T6-6061 aluminum has a tensile strength of around 45,000psi. It’s important to make sure you are getting T6, as there are other (much lower) 6061 grades. T6-7075 has a tensile strength of around 83,000psi (nearly double). It weighs just slightly more (within a margin of error as far as I am concerned). Price is roughly 2.5x the cost of 6061-T6, however. T6 is the heat/temper designation. 4130 steel has a tensile strength of 81,000psi, but weighs nearly 3x as much as aluminum, and (through my metal sources at least) has around double the cost of 6061. Steel is also much harder and so more difficult to machine for certain processes (say if you were making these yourself using hobbyist tools). The upside of the hardness is that your device will still look pretty much new even after you drop it several times and toss it into the gearbag month and after month. The devices in the pics above (with the tear drop rings) are some of the first ones I ever built, having been used for nearly a year now (thrown many dozens of times into a gearbag with steel shackles and pulleys and so on) and if you look closely they have little blemishes that reveal this. The aluminum devices will show some small scratches and maybe even a tiny ding or two if they are banging against steel hardware. For me, aluminum makes the most sense as it is strong (or REALLY strong), lightweight, pretty inexpensive, and easy to work with. The added strength of steel is appealing, but the weight puts me off. My next run will be either steel or 7075-T6, I am unsure which.
• Bevel the edges. I haven’t had any issues with the inner edges of the device cutting webbing, but if the sling is loaded a little weird and the device gets kind of crooked (more likely to happen if using a single attachment point to the sling instead of doubled rings or whatever), the webbing might touch the inner edge while under tension. Right away I realized this needs to be beveled. Rounding it with a file and sandpaper, or just using a grinder to put a 45-degree bevel both seem to work fine. Another upside of aluminum over steel is these little changes are easier to make after the fact using hand-tools. The nicest option is to CNC the entire plate from a thicker piece of aluminum, like Landcruising does, so you can machine the bevel directly onto the hardware at the same time. BalanceCommunity also recently announced their updated AWL (“3.0”) that also is CNC finished.
Things I wanted to do before publishing this article but have decided to update later
Break tests of the following webbings:
- Tubular nylon
- Type-18
- Mantra
- Spider Silk
- Gibbon ProLine
I have recently acquired a 50,000lb dyno to do the above testing, and when I have time and good weather will try to get it done.
• Slack really, really hard several times on a 50′ piece of 2″ webbing and verify that bolts do not bend. During summer (Aug, 2012) I got the final bolts and quickpins in to do this and put in a few sessions with no apparently issues. I need to do several more.
• Break testing of a low-strength polyester webbing with a variety of roller diameters (13mm, 19mm, 25mm, 32mm) and data analysis to determine how roller size affects break strength. I acquired a low strength (2000lb) poly webbing and roller materials to do this, but have decided my experimental design had flaws. I made this decision after getting a baseline using a 25mm roller, and it broke right at rated strength on that roller (something like 1975lbs). The problem with the webbing I acquired is that it’s very thin. I am still working on an experimental design that will be reasonably useful for a variety of typical highline webbings but doesn’t require me to spend to get access to a commercial wire rope testing facility.
Design updates?
I have been thinking a lot about the next generation of Kofi type device. The Kofi works great, but it’s also a sort of derivative/hybrid of what is already out there. It has some limitations that I would be interested in coming up with a novel design (something totally new) to address. I am working on a new design that will be steel and more compact. It will weigh a lot more, so I wouldn’t use it on a day to day basis. But it will have a break strength of around 50,000+ lbs (175+kN) so it would be useful for very long highline and other applications where insane strength is valued over everything else.
Questions?
I am publishing this ahead of time since it’s been a “draft” that has been visible only to me for a good 10 months now and I am getting sick of revising it with only me able to see it (and people writing to me in private to ask many of the questions that are answered above). Feel free to e-mail me if you have questions/thoughts, want some help, or want to offer some help.

Great delivery. Solid arguments. Keep up the good effort.
Can you post the drawing for the side plates? Specifically the hole orientation?
Thanks
EDIT: see my other comment. I have been playing with 2 different hole orientations and will be posting a video with a series of tests soon to hopefully get to the bottom of the best configuration for holding power and break strength.
Can you post the drawing for the side plates?
EDIT: I am open to distributing these, but for legal reasons I do this on a person-by-person basis so I can make sure I limit my liability. Basically I am pretty cool with distributing files or even hardware but I don’t want to do it publicly for both legal reasons and because this site is more about independent reviews and techniques than me stepping on the toes of the people who are already out there solving these problems with useful products. So if you read this and happen to be in love with the Kofi, feel free to e-mail me.
is there a place locally to get the teardrop rings you talk about and pictured above?
EDIT: they tend to be very hard to find due to the fact that they aren’t used much (in these small sizes) in the rigging industry. The only ones that are consistently available are probably Chinese made (I can’t say for sure but they have no maker’s mark so that indicates it is likely), which are the shiny red ones. I have many different American ones but they often are back ordered for a month or more (I have had to wait a long time). E-mail me and I can give you a link to the most recent source I have used (rather than post a link here that will probably not be relevant in a month or ten). I am in the process of break testing an aluminum Kofi, a steel Kofi, and some of these ‘probably Chinese’ rings to see what each will hold. I have pulled the Chinese hardware with tensions up to 3000lbs (1800lb working load for each ring, rigged doubled up) with no issues, but I’d like to have a small sample of broken ones to be more confident.
Very informative article, even for those not looking to machine a custom device. Really looking forward to the soft-pointing article.